How to Camp and Hike Trolltunga with a Toddler/Kid
- minna

- Jul 30, 2025
- 10 min read
Updated: Mar 26
This blog post was sponsored by Regatta and we wore their holiday shop range to keep us comfortable throughout our Norway trip. You can find the collection here.
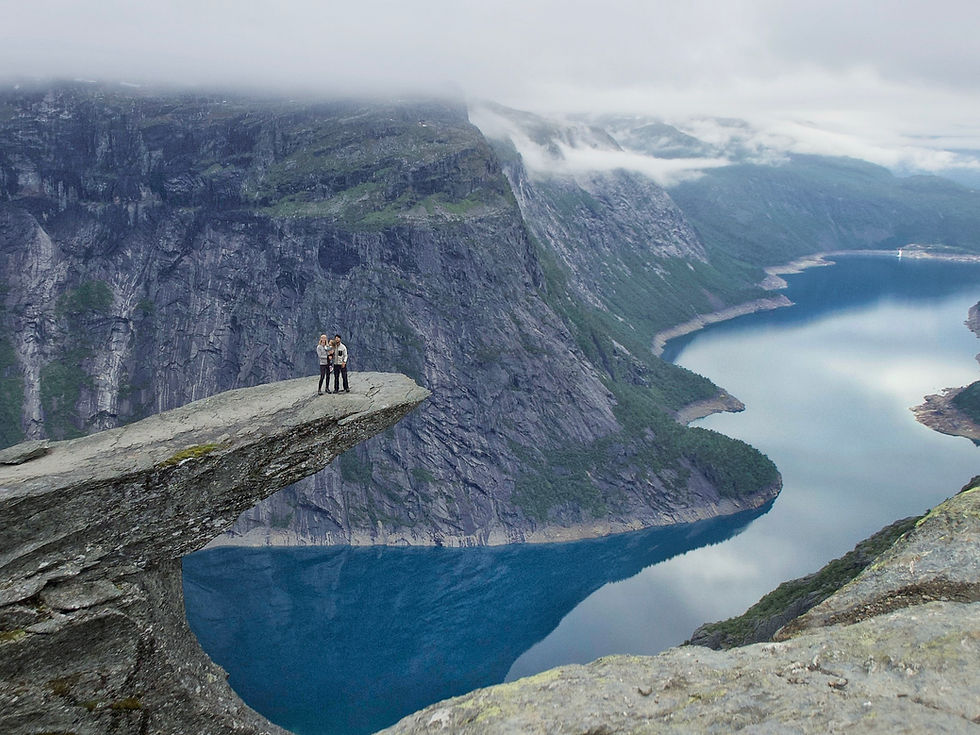
Trolltunga is one of Norway's most beautiful and iconic hikes, and has been high on my bucket list for years. Perched nearly 1,100 meters above sea level, the hike culminates in a giant protruding rock, the "Troll's Tongue", which juts out over Lake Ringedalsvatnet below, offering incredible panoramic views of the fjord and the mountains.
We recently went on a road trip from Oslo to Bergen, and seeing as the Trolltunga hike is on the way, we knew we had to add it to our itinerary. But we also knew it's definitely no walk in the park - especially with a 15kg toddler on your back - and so we started doing some research into whether or not this was actually going to be doable. We finally decided to give it a go, but spent a good amount of time researching what to bring, what to be aware of and how to keep our toddler entertained, as well as exercising daily to get in good shape.
We decided to camp at the top so we would have more time getting up/down, and we also had three friends join us, which meant there were others that could help share the load - this was a massive help!
Having completed the hike I am pleased to say it is definitely doable with a toddler, with the right equipment and preparation, and I have created the below guide outlining what you need to know if you are attempting this hike with kids (based on the experience we had).
It's important to note that the official recommendation is that the hike is not suitable for children under the age of 12, so if you are planning on doing this hike with young kids, make sure you come prepared and stay up-to-date with the latest weather conditions and advice. I would block out a couple of days of your Norway itinerary to do Trolltunga as the weather conditions can change drastically from one day to another and things like heavy fog and strong winds can be fatal. For more information, visit www.trolltunga.com and I would recommend checking out the account @trolltunga_information on Instagram.
Key details
Location | Hardangervidda National Park |
Length (from P3) | 20km roundtrip |
Duration (from P3) | 7-10hrs roundtrip |
Difficulty | Challenging |
Ascent (from P3) | 320m |
How to get to Trolltunga
Trolltunga is located in Hardangervidda National Park, near the town Odda in southwestern Norway. The nearest airport is Bergen (BGO), which is about a 3-hour drive from the start of the Trolltunga trail. The easiest way to get here is by driving, though you can get here by public transport (bus from Bergen to Odda and then a shuttle bus to the start of the trail). Weather you are camping overnight or doing the hike in one day, I would highly recommend staying nearby the night before/after. There are a few different options for hotels/Airbnbs in Odda, and if you have a car, it might even be worth looking in other nearby towns (we stayed in Røldal, about a 50-minute drive from Odda).

When to visit
The main season for hiking Trolltunga is 1st June to 31st August. You can still hike outside of these dates, but only with a guide and you may need specialist equipment like snowshoes and skiis. It's worth noting, however, that even in the summer months the weather can be cold and harsh up in the mountains - make sure to bring layers and be prepared that temperatures can still drop below zero! If you are planning on hiking back down within the same day, make sure to set out early, before 8am, to allow yourself enough time to get there and back.

Parking at Trolltunga
The hike is estimated to take between 8-15hrs roundtrip depending on where you start the hike. There are three main starting points: P1 Tyssedal, P2 Skjeggedal, and P3 Mågelitopp. We started our hike at P3, which is the car park closest to Trolltunga. From here, the hike is estimated to take around 7-10 hours roundtrip, compared to 10-12 hours from P2 and 15 hours from P1. Parking here is limited to 30 spaces, so make sure to prebook your space well in advance! Alternatively, there is a shuttle bus that takes you from P2 to P3.
It's important to note that access to the P3 car park is only open during certain hours and from June - August entrance is between 6.30am-11am and then again from 3pm-7pm.
Hiking Trolltunga and the terrain
As we were camping, we kept a slow and steady pace and the hike from P3 to Trolltunga took us 7hrs with plenty of breaks and photo stops on the way. The return leg was slightly quicker, but it still took us about 6 hours to get back down.
The trail is well-marked with signposts guiding you along the route so the chances of getting lost are low. The trail involves some steep ascents and parts of the trail are quite rocky. The steepest stretch is at the start of the hike where there are stone steps going up with an incline of about 300 metres. After that it does level out, making the rest of the hike much more bearable.

As the trail is quite rocky, it can get slippery at times - especially near the many streams and waterfalls, or if it's raining. There was also snow up on the mountains when we went in early July, though there was no snow on the actual trail itself. An additional benefit of doing it in the summer is the phenomenon of the midnight sun in Norway - we started out at 11am and when we arrived at 8pm it was still broad daylight!

What to wear
The Norwegian mountains and weather can be unpredictable, so it's important to invest in high quality clothing. During the hike we experienced rain, sun, snow (on the ground) and cold clouds so wear sturdy hiking boots, thermals, warm layers, waterproofs and hats & gloves to make sure that you are prepared for the variety of conditions you will face on the hike.


We partnered with Regatta on this hike and wore their holiday shop collection which kept us warm and dry for the duration of the hike.
If you are missing any items before the hike you can also hire things from Trolltunga Active who are based at the P2 car park.
To camp or not to camp?
Honestly, this camping experience at Trolltunga was the highlight of our Norway road trip and having Trolltunga alone and going to sleep watching the midnight sun from the top of the mountain was truly magical.

Whilst it meant that our bags were heavier, we felt that camping would give us much greater flexibility with Malva, meaning we could take things slow and she could have more time to walk by herself and play on the way.

There are several designated camping areas along the route which are clearly marked on maps along the trail, and the last of which is about a 10-minute walk away from the Trolltunga stone. We chose a spot relatively close to the edge so we could wake up and admire the views of the fjords below (but we were very careful not to let our daughter get too close!).
The iconic Trolltunga photo
Having seen Trolltunga in countless photos, I knew what to expect but honestly, being there and seeing it with my own eyes still blew me away! It is definitely up there of the most beautiful views I've seen in my life - and it was made even more special as when we arrived at 8pm, we were the only ones there and got Trolltunga all to ourselves. I would say camping is worth it for that experience alone!

If you are just going for the day, expect it to be busy, and you might have to wait 30-60 minutes to get out on the rock, and you will probably only have time for a quick photo before letting the next person have their go. Even when we came back in the morning next day (around 9.30am) there was already a queue of people waiting, so we decided to just make a move instead.
The area itself, however, is very spacious and Malva could run around freely, and there is even some decking with benches and tables where you can sit down and have a snack. To get to the Trolltunga rock, you climb down a metal ladder before you walk out onto the main stone - and reassuringly, the stone is a lot larger and wider than it looks in photos! We chose to take Malva out of the carrier for this part and instead carried her the whole way.
What else to bring on the hike?
As well as warm clothing there are some other essentials you will need to bring on this hike to make sure that it's as easy as possible:

Good baby/toddler carrier - if you're going to be carrying your toddler the most important thing will be a carrier which is comfortable for you both. In the next section I go into detail on what we used and what I would recommend.
Refillable water bottles - you won't need to carry lots of water on this hike as you will have access to fresh mountain water flowing from the many waterfalls on the trail. My daughter loved refilling the water bottle by herself and it was so refreshing to drink!
Hiking poles - I had rolled my ankle a few days before the hike and honestly wasn't sure if I would be able to do this hike. The hiking poles really helped take the weight off and gave me the security I needed especially, during the steep inclines and when we were going down again
Duct tape - much to my regret we didn't bring this... Unfortunately, I managed to drop my phone down a narrow gorge and whilst I could reach it with the hiking poles at full extension, there was no way to get it back. Maybe, just maybe, if I had brought a roll of duct tape I would still have my phone...
Snacks - high protein and high fat snacks were key to keeping our energy levels up and keeping Malva happy on the hike. We brought protein bars, boiled eggs, nuts, apples and yoghurt pouches. We also brought electrolytes for our water bottles which really helped too.
Toddler headphones - this was a long hike and we knew that it would be challenging to keep Malva entertained so our last resort was screen time. Thankfully we only used it once which was the final descent on the way down as there was a frantic tantrum happening on my back which was throwing my balance off.
Bin bags - there are no bins on the way so it's important to bring all rubbish back with you down the mountain and leave no trace.
If you're camping here are a few additional essentials:
Lightweight tent
Warm sleeping bag & sleeping mat
Head torch
Which carrier to use?
Our daughter is 2.5 years old and weighs 15kg so a carrier was essential to making sure we could complete the hike. For this hike we decided to bring 2 carriers - the Phil &Teds Escape Carrier and the Izmi Breeze Adventure Toddler Carrier.
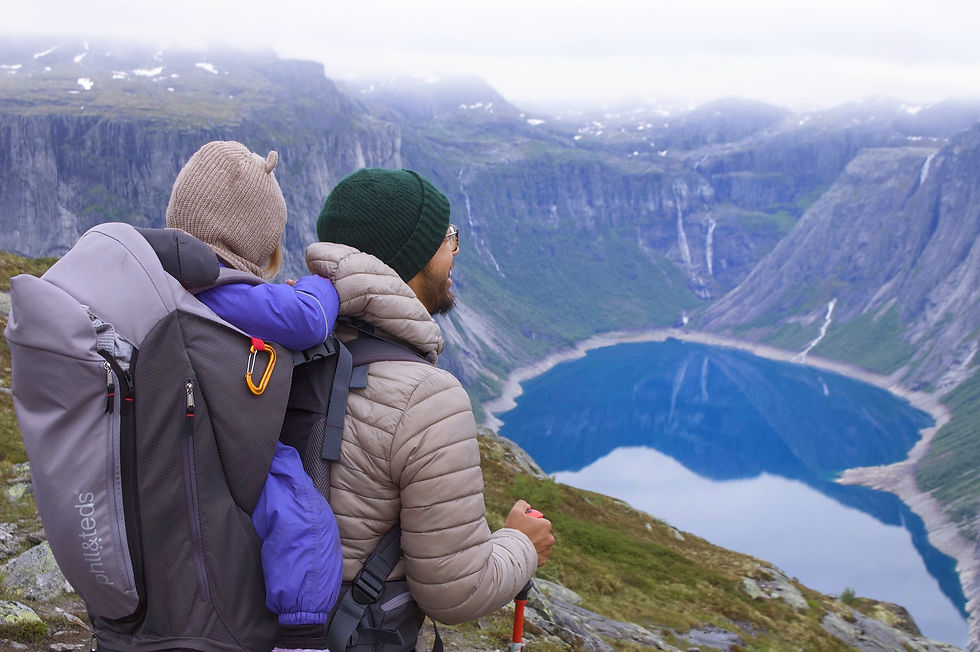
We figured that whilst she was awake she would enjoy the Escape backpack carrier more as she is in an elevated position and could see out more, however, as Malva still naps in the day, we also needed a safe way to carry her while she slept. This is why we also brought along the Izmi carrier, which works for both front and back carry and also has some netting which can be clipped on to keep they're heads secure when they're sleeping.
Clearly the downside of bringing a separate carrier for when she is sleeping is that we then she was sleeping in the Izmi carrier, we had to carry the empty the backpack carrier along with us which was quite bulky. I would probably suggest to only bring one carrier if you can, and choose one that best corresponds to your needs.
If you are interested in the Izmi carrier, you can get 10% off your order by using this link and applying the code TTD10 at checkout.
How to entertain your toddler?
One of the most challenging things about this hike, was to keep Malva entertained for the whole 13 hours of hiking. We tried to be creative and play different games like I Spy and singing her favourite songs. As we were in Norway and her favourite film is Frozen, we also made up some games, pretending we were in Arendale looking for Anna and Elsa - this was a big hit!

Snacks were also our friend and making sure she was well fed (fruit, nuts and plenty of biscuits) was a good way to keep her happy on the hike.
When she eventually got bored of being carried, we would let her walk by herself (as long as it was safe to do so) and stop to play. This was a big part in why it took us so long to get to the top, and why we felt camping was the best option. She really enjoyed walking by herself and there was plenty to see and do on the way - smelling flowers, playing in the snow and open, safe spaces where she could just run around freely.
She definitely enjoyed it more once we set camp as she could explore more freely and run around playing in nature. We were celebrating Minna's birthday the following day, so we had brought balloons and she loved playing with these the next morning in the misty mountains!

Inevitably with a 2-year-old there were tantrums and these were not the easiest to manage, but we got there (having her final molar come through on the hike also did not help...). As already mentioned, we did use screen time as a last resort, but this was kept to a minimum.
Final thanks
Although we would have attempted Trolltunga even if it was just us, having friends and family join us was a huge advantage, and made it a lot easier, especially for things like carrying food and camping gear. It was a really special trip, and celebrating Minna's birthday on the top of Trolltunga with her closest friends and family was something we'll never forget - thank you!

We'd also like to thank Regatta who sponsored this blog post and provided hiking shoes, tops, jumpers, leggings, shorts, swimwear and jackets from their holiday shop range to keep us comfortable throughout our Norway trip. You can find the collection here.


